SELECT acra.cash_receipt_id,
DECODE (acra.TYPE,
'cash', 'cash receipt receipt',
'misc', 'miscellaneous',
acra.TYPE
) receipt_type,
acra.currency_code, acra.doc_sequence_value receipt_number,
acra.receipt_number reference_number,
TRUNC (acra.receipt_date) receipt_date, hp.party_name received_from,
acra.misc_payment_source, hca.account_number customer_no,
NVL (acra.amount, 0) entered_amount,
NVL (acra.amount, 0) * NVL (acra.exchange_rate, 1) functional_amount,
arm.NAME payment_method, abaa.bank_account_num bank_acc_num,
abb.bank_name, abb.bank_branch_name, acra.comments description
FROM ar_cash_receipts_all acra,
ar_receipt_methods arm,
ap_bank_accounts_all abaa,
ap_bank_branches abb,
hz_cust_accounts hca,
hz_parties hp
WHERE acra.pay_from_customer = hca.cust_account_id(+)
AND acra.org_id = abaa.org_id(+)
AND hca.party_id = hp.party_id(+)
AND acra.receipt_method_id = arm.receipt_method_id
AND acra.remittance_bank_account_id = abaa.bank_account_id
AND abaa.bank_branch_id = abb.bank_branch_id
ORDER BY TRUNC (acra.receipt_date), acra.doc_sequence_value;
Wednesday, 20 July 2011

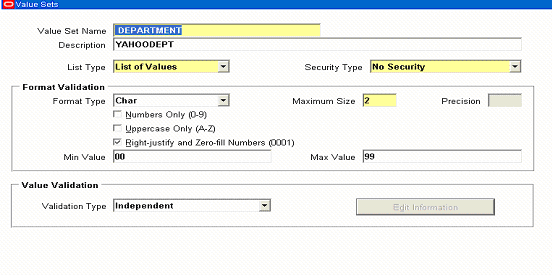
Value Sets in Oracle Apps
Value Set is a collection of values. It validates the values entered by the user for a flex-field, report parameters or a concurrent.
The navigation path: Application :- Validation :- Sets

Value Set is associated with the following validations which holds the key to the value sets.
Types of Validations:
- None :- Validation is minimal.

- Independent :- The data input is based on previously defined list of values.
- Dependent :- The data input is checked against a defined set of values.


- Table :- The data input is checked against values in a table.


- Special :- The data input is checked against a flex-field.


- Pair :- The data input is checked against two flex-field specified range of values.


- Translatable independent :- The data input is checked against previously defined list of values.

- Translatable dependent :- The data input is checked against defined set of values.
Significance of $FLEX$
$FLEX$: enables to match the prior segment with either value set name or segment name.
Let v2 be the value set definition of 2nd parameter and v1 be the value set definition for the first parameter then
In the value set definition of v2 = value $FLEX$.v1
Note:
Changes You Should Never Make
You should never make these types of changes (old value set to new value set) because you will corrupt your existing key flex-field combinations data:
. Independent to Dependent
. Dependent to Independent
. None to Dependent
. Dependent to Table
. Table to Dependent
. Translatable Independent to Translatable Dependent
. Translatable Dependent to Translatable Independent
. None to Translatable Dependent
. Translatable Dependent to Table
. Table to Translatable Dependent
Monday, 18 July 2011
LAG and LEAD FUNCTIONS IN SQL
LAG:
 SELECT empno,
         ename,
         job,
         sal,
         LAG(sal, 1, 0) OVER (ORDER BY sal) AS sal_prev,
         sal - LAG(sal, 1, 0) OVER (ORDER BY sal) AS sal_diff
FROM emp; LEAD: SELECT empno, ename, job, sal, LEAD(sal, 1, 0) OVER (ORDER BY sal) AS sal_next, LEAD(sal, 1, 0) OVER (ORDER BY sal) - sal AS sal_diff FROM emp;
Finding Host_Name and Host_Address and Profile Option Using Query
select utl_inaddr.get_host_name FROM dual;
select utl_inaddr.get_host_address FROM dual;
select * from icx_parameters
SELECT PROFILE_OPTION_VALUE
FROM FND_PROFILE_OPTION_VALUES
WHERE PROFILE_OPTION_ID = (SELECT PROFILE_OPTION_ID
FROM FND_PROFILE_OPTIONS
WHERE PROFILE_OPTION_NAME ='APPS_FRAMEWORK_AGENT')
AND LEVEL_VALUE=0
select utl_inaddr.get_host_address FROM dual;
select * from icx_parameters
SELECT PROFILE_OPTION_VALUE
FROM FND_PROFILE_OPTION_VALUES
WHERE PROFILE_OPTION_ID = (SELECT PROFILE_OPTION_ID
FROM FND_PROFILE_OPTIONS
WHERE PROFILE_OPTION_NAME ='APPS_FRAMEWORK_AGENT')
AND LEVEL_VALUE=0
Friday, 15 July 2011
Convert Amount into Words
create or replace FUNCTION spell_money (p_number IN NUMBER)
RETURN VARCHAR2
AS
TYPE myarray IS TABLE OF VARCHAR2 (255);
l_str myarray
:= myarray (' Thousand ',
' Lakh ',
' Crore ',
' Arab ',
' Kharab ',
' Shankh '
);
l_num VARCHAR2 (50) DEFAULT TRUNC (p_number);
l_return VARCHAR2 (4000);
BEGIN
IF (SUBSTR (l_num, LENGTH (l_num) - 2, 3) <> 0)
THEN
l_return :=
TO_CHAR (TO_DATE (SUBSTR (l_num, LENGTH (l_num) - 2, 3), 'J'),
'Jsp');
END IF;
l_num := SUBSTR (l_num, 1, LENGTH (l_num) - 3);
FOR i IN 1 .. l_str.COUNT
LOOP
EXIT WHEN l_num IS NULL;
IF (SUBSTR (l_num, LENGTH (l_num) - 1, 2) <> 0)
THEN
l_return :=
TO_CHAR (TO_DATE (SUBSTR (l_num, LENGTH (l_num) - 1, 2), 'J'),
'Jsp'
)
|| l_str (i)
|| l_return;
END IF;
l_num := SUBSTR (l_num, 1, LENGTH (l_num) - 2);
END LOOP;
IF TO_CHAR (p_number) LIKE '%.%'
THEN
l_num := SUBSTR (ROUND (p_number, 2), INSTR (p_number, '.') + 1);
IF (LENGTH (SUBSTR (ROUND (p_number, 2), INSTR (p_number, '.') + 1))) =
1
THEN
l_num := TO_NUMBER (TO_CHAR (l_num) || '0');
END IF;
IF l_num > 0
THEN
l_return :=
l_return
|| ' And '
|| TO_CHAR (TO_DATE (l_num, 'J'), 'Jsp')
|| ' Paise';
END IF;
END IF;
RETURN (l_return||' only');
END spell_money;
select spell_money(2000) from dual;
SPELL_MONEY(2000)
Two Thousand only
Views:Basic Concepts
Views
1.A view is a predefined query on one or more tables.
2.Retrieving information from a view is done in the same manner as retrieving from a table.
3.With some views you can also perform DML operations (delete, insert, update) on the base tables.
4.Views don’t store data, they only access rows in the base tables.
5.user_tables, user_sequences, and user_indexes are all views.
6.View Only allows a user to retrieve data.
7.view can hide the underlying base tables.
8.By writing complex queries as a view, we can hide complexity from an end user.
9.View only allows a user to access certain rows in the base tables.
Advantages of Views
• To restrict data access
• To make complex queries easy
• To provide data independence
• To present different views of the same data
Creating and Using a View
You create a view using CREATE VIEW , which has the following simplified syntax:
CREATE [OR REPLACE][{FORCE | NOFORCE}] VIEW view_name
[(alias_name[, alias_name...])] AS subquery
[WITH {CHECK OPTION | READ ONLY} CONSTRAINT constraint_name];
where
1.OR REPLACE specifies the view is to replace an existing view if present.
2.FORCE specifies the view is to be created even if the base tables don’t exist.
3.NOFORCE specifies the view is not to be created if the base tables don’t exist; NOFORCE is the default.
4.alias_name specifies the name of an alias for an expression in the subquery.
5.There must be the same number of aliases as there are expressions in the subquery.
6.subquery specifies the subquery that retrieves from the base tables.
7.If you’ve supplied aliases, you can use those aliases in the list after the SELECT clause.
8.WITH CHECK OPTION specifies that only the rows that would be retrieved by the subquery can be inserted, updated, or deleted.
9.By default, rows are not checked that they are retrievable by the subquery before they are inserted, updated, or deleted.
10.constraint_name specifies the name of the WITH CHECK OPTION or READ ONLY constraint.
11.WITH READ ONLY specifies that rows may only read from the base tables.
There are two basic types of views:
Simple views:
*)Derives data from only one table
*)Contains no functions or groups of data
*)Can perform DML operations through the view
Complex views:
*)Derives data from many tables
*)Contains functions or groups of data
*)Does not always allow DML operations through the view
Creating a View with a CHECK OPTION Constraint
You can specify that DML operations on a view must satisfy the subquery by adding a CHECK OPTION constraint to the view.
CREATE VIEW myView AS
SELECT *
FROM employee
WHERE id INSERT INTO myView (id) VALUES (0);
1 row created.
INSERT INTO myView (id) VALUES (7);
INSERT INTO myView (id) VALUES (7)
*
ERROR at line 1:
ORA-01402: view WITH CHECK OPTION where-clause violation
Creating a View with a READ ONLY Constraint
You can make a view read only by adding a READ ONLY constraint to the view.
CREATE VIEW myView AS
SELECT *
FROM employee
WITH READ ONLY CONSTRAINT my_view_read_only;
View created.
INSERT INTO myView (id) VALUES (1);
INSERT INTO myView (id) VALUES (1)
*
ERROR at line 1:
ORA-01733: virtual column not allowed here
Performing an INSERT Using a View
You can only perform DML operations with simple views.Complex views don’t support DML.
CREATE VIEW employee_view AS
SELECT id, first_name, last_name
FROM employee;
View created.
INSERT INTO employee_view (id, first_name, last_name) VALUES (
13, 'New','Western');
1 row created.
1 row is created in the employee table.
Modifying a View
You can completely replace a view using CREATE OR REPLACE. You can alter the constraints on a view using ALTER VIEW.
CREATE VIEW myView AS
SELECT *
FROM employee
WITH READ ONLY CONSTRAINT my_view_read_only;
View created.
ALTER VIEW myview
DROP CONSTRAINT my_view_read_only;
View altered.
Create a complex view with group by and having clause
CREATE VIEW myview AS
SELECT city, AVG(salary) average_salary
FROM employee
GROUP BY city
HAVING AVG(salary)>50000;
Removing a View
You can remove a view without losing data because a view is based on underlying tables in the database.
DROP VIEW myview;
Inline Views
• An inline view is a subquery with an alias (or correlation name) that you can use within a SQL statement.
• A named subquery in the FROM clause of the main query is an example of an inline view.
Materialized Views
A materialized view is a database object that contains the results of a query. The FROM clause of the query can name tables, views, and other materialized views. Collectively these objects are called master tables (a replication term) or detail tables (a data warehousing term). This reference uses “master tables” for consistency. The databases containing the master tables are called the master databases.
When you create a materialized view, Oracle Database creates one internal table and at least one index, and may create one view, all in the schema of the materialized view. Oracle Database uses these objects to maintain the materialized view data. You must have the privileges necessary to create these objects.
Cursors in Oracle
CURSORS:
A cursor is a mechanism by which you can assign a name to a “select statement” and manipulate the information within that SQL statement. Cursor is a pointer, which works on active set, i.e. which points to only one row at a time in the context area’s ACTIVE SET. A cursor is a construct of pl/sql, used to process multiple rows using a pl/sql block.
Implicit and Explicit cursors:
Oracle automatically declares an implicit cursor every time a SQL statement is executed. The user is unaware of this and cannot control or process the information in an implicit cursor.
We define an explicit cursor for any query that returns more than one row of data. This means that the programmer has declared the cursor within the PL/SQL code block. This declaration allows the application to sequentially process each row of data as the cursor returns it.
Difference between implicit and explicit cursors:
An explicit cursor is declared opened and fetched from in the program block where as an implicit cursor is automatically generated for SQL statements that process a single row only.
How an Implicit cursor works?
- Any given PL/SQL block issues an implicit cursor whenever a SQL statement is executed, as long as an explicit cursor does not exist for that SQL statement.
- A cursor is automatically associated with every DML statement (UPDATE, DELETE, INSERT).
- All UPDATE and DELETE statements have cursors that identify the set of rows that will be affected by the operation.
- An INSERT statement needs a place to receive the data that is to be inserted into the database; the implicit cursor fulfills this need.
- The most recently opened cursor is called the SQL cursor.
How an Explicit cursor works?
The process of working with an explicit cursor consists of the following steps:
- Declaring the cursor: This initializes the cursor into memory.
- Opening the cursor: The declared cursor is opened, and memory is allotted.
- Fetching the cursor: The declared and opened cursor can now retrieve data.
- Closing the cursor: The declared, opened, and fetched cursor must be closed to release the memory allocation.
Declaring a Cursor:
- Cursor without parameters (simplest)
| CURSOR cursor_name IS SELECT_statement; |
- Cursor with parameters
CURSOR cursor_name (parameter_list)
IS
SELECT_statement;
IS
SELECT_statement;
- Cursor with return clause
CURSOR cursor_name
RETURN field%ROWTYPE
IS SELECT_statement;
RETURN field%ROWTYPE
IS SELECT_statement;
Opening the Cursor:
When a cursor is opened the active set is determined, the rows satisfying the where clause in the select statement are added to the active set. A pointer is established and points to the first row in the active set.
OPEN cursor_name;
Fetching the Data:
The purpose of using a cursor, in most cases, is to retrieve the rows from your cursor so that some type of operation can be performed on the data. After declaring and opening your cursor, the next step is to FETCH the rows from your cursor.
FETCH cursor_name INTO <list of variables>;
Closing the Cursor:
The final step of working with cursors is to close the cursor once you have finished using it.
CLOSE cursor_name;
Example:
| Declare |
|
| Vno emp.empno%type; |
|
| Vname emp.ename %type; |
|
| Cursor emp_cursor is Select empno,ename From emp; |
|
| Begin |
|
| Open cursor; |
|
| For I in 1..10 loop |
|
Fetch emp_cursor into vno,vname; |
|
| dbms_output.put_line(to_char(vno) ||’ ‘||vname); |
|
| End loop; |
| End; |
Implicit & explicit cursor attributes:
Both Implicit and Explicit cursor have 4 attributes:
Implicit Cursor:
1. %ISOPEN: The Oracle engine automatically opens and closed the SQL cursor after executing its associated select, insert, update or delete SQL statement has been processed in case of implicit cursor. Thus the SQL%ISOPEN attribute of an implicit cursor cannot be referenced outside of its SQL statement. As a result, SQL%ISOPEN always evaluates to FALSE.
2. %FOUND: Evaluates to TRUE, if an insert, update or delete affected one or more rows, or a single-row select returned one or more rows. Otherwise it evaluates to FALSE. The syntax for accessing this attribute is SQL%FOUND.
3. %NOTFOUND: It is logical opposite of %FOUND. It evaluates to TRUE, if an insert , update or delete affected no rows, or otherwise it evaluates to FALSE. The syntax for accessing this attribute is SQL%NOTFOUND.
4. %ROWCOUNT: Returns the numbers of rows affected by an insert , update or delete, or select into statement. The syntax for accessing this attribute is SQL%ROWCOUNT.
Explicit Cursor:
1. %ISOPEN: Return TRUE if cursor is open, FALSE otherwise.
2. %FOUND: Return TRUE if record was fetched successfully, FALSE otherwise.
3. %NOTFOUND: Return TRUE if record was not fetched successfully, FALSE otherwise.
4. %ROWCOUNT: Returns number of records processed from the cursor.
Example:
| Begin |
|
| Open emp_cursor; |
|
| Loop |
|
| Fetch when emp_cursor % rowcount >10 or Emp_curor % not found; |
|
| dbms_output.put_line(to_char(vno)||’ ‘|| vname); |
|
| End loop; |
|
| Close emp_cursor; |
| End; |
Select For Update statement:
The Select For Update statement allows you to lock the records in the cursor result set. You are not required to make changes to the records in order to use this statement. The record locks are released when the next commit or rollback statement is issued.
The syntax for the Select For Update is:
CURSOR cursor_name
IS
select_statement
FOR UPDATE [of column_list] [NOWAIT];
IS
select_statement
FOR UPDATE [of column_list] [NOWAIT];
If you plan on updating or deleting records that have been referenced by a Select For Update statement, you can use the Where Current Of statement.
Where Current Of statement:
If you plan on updating or deleting records that have been referenced by a Select For Update statement, you can use the Where Current Of statement.
The syntax for the Where Current Of statement is either:
UPDATE table_name
SET set_clause
WHERE CURRENT OF cursor_name;
SET set_clause
WHERE CURRENT OF cursor_name;
OR
DELETE FROM table_name
WHERE CURRENT OF cursor_name;
WHERE CURRENT OF cursor_name;
The Where Current Of statement allows you to update or delete the record that was last fetched by the cursor.
Few PL/SQL Cursor Exceptions:
- Cursor_Already_Open
- Invalid_Cursor
What is REF Cursor?
A REF CURSOR is basically a data type. A variable created based on such a data type is generally called a cursor variable. A cursor variable can be associated with different queries at run-time.
To execute a multi-row query, oracle opens an unnamed work area that stores processing information. To access the information, an explicit cursor, which names the work area or, a cursor variable, which points to the work area can be used.
Whereas a cursor always refers to the same query work area, a cursor variable can refer to a different work areas. Cursor variables are like ‘c’ pointers, which hold the memory location(address) of some object instead of the object itself.
Describe a cursor for loop
You would use a CURSOR FOR Loop when you want to fetch and process every record in a cursor. The CURSOR FOR Loop will terminate when all of the records in the cursor have been fetched.
The syntax for the CURSOR FOR Loop is:
FOR record_index in cursor_name
LOOP
{.statements.}
END LOOP;
LOOP
{.statements.}
END LOOP;
Example:
| Declare |
|
| Cursor emp_cursor is |
|
| Select empno,ename From emp; |
|
| Begin |
|
| For emp_record in emp_cursor loop |
|
| Dbms_output.put_line(emp_record.empno); |
|
| Dbms_output.put_line(emp_record.ename) |
|
| End loop; |
|
| End; |
Subscribe to:
Posts (Atom)